
Need a simple spring refresh for your front porch? Make a DIY monogram planter box and fill it with spring flowers. Here’s the step-by-step.

// daisy wreath // topiary bush // solar lanterns // three ball topiary //
Just in case you didn’t know?
The most brilliant people in the world read this blog.
It’s true.
You send me emails and give me ideas and inspiration and make suggestions every single day. It’s truly one of my favorite things. So many times you see things that I miss. Things that help to make this wonderful old house even cuter. Things that help me to add personality and character to all my spaces.
Like this porch.
I shared the porch last week in a post and I got an email from one of the sweetest readers named Lee with an idea.
An idea so brilliant and yet so simple that I knew it had to be done.
It only took five minutes and it’s the simplest change that makes the biggest impact.
Can you guess what I changed?
Because now? The front porch looks like this.

// daisy wreath // topiary bush // solar lanterns // three ball topiary //
Did you figure it out?
Scroll up and look at the first picture.
And then look at the second.
There’s just the tiniest of changes but it brings the entire porch together.

// daisy wreath // topiary bush // solar lanterns // three ball topiary //
It’s the planters.
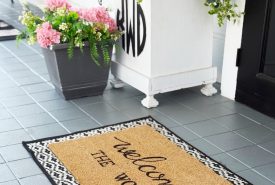
There’s always been a monogram on them, but it was painted white just like the planter.
In the email, my wonderful friend Lee suggested that I paint the monogram black.
See what I mean.
Brilliant.
Why didn’t I think of that? I stare at those planters every single day and I really love them, but I’ve always felt like they were missing something.

Here’s what the monogram looked like when I started.
Plain.
Simple.
Blending in.

A little roller.
A little black paint.
I just rolled the foam roller over the front part of the monogram.

And here’s the after.
It’s one of my favorite kind of projects.
One that’s simple, easy and takes about 10 minutes.
But the results?
They make SUCH A DIFFERENCE.
But wait you are probably saying. Where did you get the letters? How did you add the monogram? How did you build the planter?
One brilliant idea deserves another.
Here’s all the DIY monogram planter information.

// daisy wreath // topiary bush // solar lanterns // three ball topiary //
DIY Monogram Planter Box
Supplies:
- wood planter box—you can make one like mine here
- three letter wood monogram (there are tons of options like this one and this one and this one)
- wood glue
- curtain finials
- white paint
- caulk

Step 1: add curtain finials
I found these curtain finials at Lowe’s. They have a ton on clearance at our store.
You can also find them at Wal-Mart or Hobby Lobby.
The key is just finding the size and shape that works for your design. I was thinking of just adding round balls, but I was hooked when I saw these.
The plus of lifting your planter off the ground with feet is that it helps with drainage when you water your plants. You can drill holes in the bottom of the wood planter so that water can get out. Also, if you have a little bit of dirt, debris or mold on your planter from years of use, bleach before painting.

Step 2: layout wood monogram
The key to any monogram planter box is the monogram.
You can find tons of these monograms on Amazon.
Here’s one that’s SUPER SIMILAR.
And this really pretty option.

Step 3: Glue the monogram to your planter box
The next step is to glue your three letter monogram to create your monogram planter box.
We used a basic wood glue. Do NOT use too much of it or it will leak out of the sides and you’ll be stuck for a while with a q-tip to catch the drips.
Use a ruler to center the monogram on the wood box and then glue it in place.
Simple tip: place the two boxes next to each other when you line up the letters to make sure you are gluing them so they are the same height on each box.

// daisy wreath // topiary bush // solar lanterns // three ball topiary //
step 4: Caulk and paint
We used caulk to fill in the holes in the planter that had happened over the years from wear and tear.
We did NOT caulk around the letters. The paint kind of acts like a caulk and I wanted the letters to stand out as much as possible because we were painting white on white.
After you’ve finished caulking, paint the planter box.
We used SW Extra White in semi-gloss to paint the planters.
(total aside: you can read my guide on what finish to paint where here.)
Then?
After the planters sit on the front porch for over a year? Listen to the most brilliant idea from a reader and make the monograms pop with a contrasting color.

// daisy wreath // topiary bush // solar lanterns // three ball topiary //
Here are the planter boxes again on the front porch.
This project just proves a very valuable point. Most everything I used for this project I had lying around my house—the planters, the monograms, the paint, etc. I have some curtain finials, too if I could remember where I put them.
The point?
Sometimes we already have what we need to make a project.
We just need a little creativity and a spring day.
And a BRILLIANT idea from a friend. 🙂
PS You can find tons of these monograms on Amazon.
Here’s one that’s SUPER SIMILAR.
And this really pretty option.

// black and white pillows // waterproof pillow inserts //

// black and white pillows // waterproof pillow inserts //
PPS I also just added these pillow covers to the benches on the front porch.
Don’t you think they need a monogram, too?
No worries. I’m already planning my next project.
disclosure: affiliate links are used in this post


You are so right - that little change made all the difference. Everything looks beautiful.
I completely agree that little changes make all the difference; however, not everything needs changing. I prefer the monogram in white, in the same color as the planters. In my opinion, they looked more refined and very classy. This is way too in-your-face for me… sort of like a huge logo on clothing or a bag.
I sort of agree Marti
I agree.. not so BUSY.
They look great, I may just copy your brilliant idea!
A little black contrast is needed in a lot of spaces. That looks awesome. I try to add at least one black item to every room in my house. Your porch is always pretty.
I can’t BELIEVE this! You did it! And it works! My heart’s pounding, I made my husband come read it with me when I realized it just might be…and it WAS! I always say it takes “ fresh eyes” sometimes to see it in a different way! Thanks KariAnne!
This is really very sweet!! It's like your house is a monogrammed locket with so much joy inside!!! xoxo
So cute. Just a thought look on MudPie and they have the cutest small white indoor planters with the round knobs on them. On sale now for $7.50. Thought this would be a Kari look for Spring.
I like the change to the planters! I would not, though, add monograms to the pillows, that would be too much.
The black paint really makes the monogram POP! You always do such a beautiful job with both of your porches. Lovely!
Thumbs up to the new and updated monograms! They make a statement. They really make the porch-entry area pop!! Kudos to you. Big Hugs,
This was brilliant! Totally!!!
Best kind. Simple fix. Big results! Even prettier!
I loved it before, but those black monogrammed letters tie it all together. The beautiful plants and lanterns-sigh- beautiful! ❤️
KariAnne What a difference. They look so stylish.
I love the black monogram — really makes an already perfect porch pop!!!🤗
Love your white planters with their new black monogram! These planters look so classy with your black lanterns, KariAnne! Your home is just so beautiful with adding all your personal touches. You are so gifted! Thanks for sharing the instructions for your planters. My dear hubby has agreed to make me two of them for our front porch.
WOW! GREAT update! I'd also love the planters black with white monograms. But YES to either contrast - because you couldn't even see them before. Love it, KA!!
Simple but oh so pretty and those monogramed planters are so cute!
Oh, yes! I love it! Looks great! 🥰
I thought the lady who said it would look great with black initials was right! You did too - they look wonderful!
KariAnne...I love it both ways, although the black lettering brings it into sharper focus. Beautiful! I too love projects. Enjoying everything you post! Blessings.
Little things mean alot....its so true, these planters have taken on a brand new life, just love them. xx
I love your genius reader! Love the update!
I love it! Great change! So wonderful when little things make such a big difference.
Lee has a great idea. Those black letters look wonderful!